Usando Arduino GPS Shield com Google My Maps
O sistema GPS se mostra essencial nos dias de hoje. Ele está presente em drones, aviões comerciais, robôs terrestres e carros elétricos autônomos. Embora o sistema GPS esteja presente em diversas tecnologias de ponta, ele também está acessível a você que quer desenvolver seus projetos utilizando este recurso. Existem diversas maneiras de implementar um sistema de geolocalização usando GPS. Neste post iremos mostrar como gravar as coordenadas de GPS em um cartão SD e fazer a exibição desses dados no Google My Maps, usando o Arduino GPS Shield Duinopeak para Arduino.
Material Utilizado
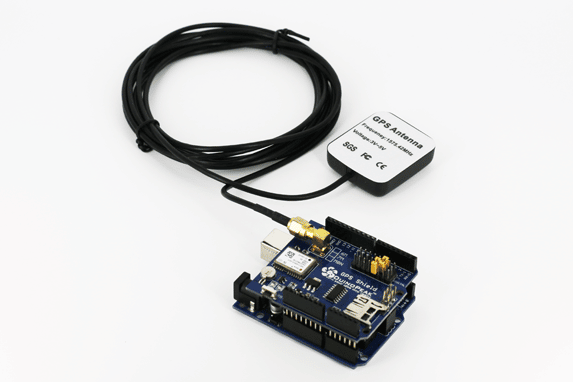
Funcionamento do Shield GPS Duinopeak
O Arduino GPS Shield Duinopeak é composto das seguintes partes:

Ele se comunica com o Arduino através da interface UART com uma velocidade de transmissão padrão de 9600bps. É possível usar tanto a interface serial nativa do Arduino (Pinos D0 e D1) como uma interface serial via Software (Software Serial).
A interface serial de comunicação é selecionada entre os pinos D2 e D7 através de jumpers. Para este post deixaremos livre a porta Hardware Serial do Arduino para facilitar a programação do mesmo e usaremos os pinos 2 e 3 para comunicação via Software Serial com o shield GPS. Os jumpers devem ficar da seguinte maneira:

O Arduino GPS Shield conta também com um leitor de cartão SD que utiliza a interface SPI do Arduino para comunicação. Com isso existe a possibilidade de gravar os dados de GPS em um cartão SD funcionando como um datalogger. Mostraremos a utilização do cartão SD mais adiante. Lembrando que o cartão deve estar formatado em FAT.
O Shield possui dois LEDs de indicação. O LED PWR deve acender sólido indicando que o Shield está energizado e o LED TP deve piscar indicando que o Shield realizou a localização dos satélites de GPS.
Programa Arduino GPS Datalogger
Antes de compilar o programa exemplo, precisamos baixar e instalar a biblioteca TinyGPS. Com essa biblioteca é possível “parsear” os dados NMEA produzidos pelo GPS e extrair informações importantes como latitude, longitude, velocidade, número de satélites e etc.
Então esses dados são gravados em um arquivo no formato CSV dentro do cartão SD. Esse arquivo gerado terá nome GPSLOGxx.CSV e será incrementado um número cada vez que o Arduino reiniciar.
Para fazer o download da biblioteca TinyGPS acesse aqui e baixe o arquivo .zip da última versão da biblioteca. Então, na IDE do Arduino clique em Sketch -> Incluir Biblioteca -> Adicionar biblioteca .ZIP.

Copie o programa a seguir dentro da IDE Arduino e grave no Arduino.
/******************************************************************************
  This example uses SoftwareSerial to communicate with the GPS module on
  pins 8 and 9, then communicates over SPI to log that data to a uSD card.

  It uses the TinyGPS++ library to parse the NMEA strings sent by the GPS module,
  and prints interesting GPS information - comma separated - to a newly created
  file on the SD card.

  Resources:
  TinyGPS++ Library  - https://github.com/mikalhart/TinyGPSPlus/releases
  SD Library (Built-in)
  SoftwareSerial Library (Built-in)

  Development/hardware environment specifics:
  Arduino IDE 1.6.7
  GPS Logger Shield v2.0 - Make sure the UART switch is set to SW-UART
  Arduino Uno, RedBoard, Pro, Mega, etc.
******************************************************************************/

#include <SPI.h>
#include <SD.h>
#include <TinyGPS++.h>

#define ARDUINO_USD_CS 8 // uSD card CS pin (pin 8 on Duinopeak GPS Logger Shield)

/////////////////////////
// Log File Defintions //
/////////////////////////
// Keep in mind, the SD library has max file name lengths of 8.3 - 8 char prefix,
// and a 3 char suffix.
// Our log files are called "gpslogXX.csv, so "gpslog99.csv" is our max file.
#define LOG_FILE_PREFIX "gpslog" // Name of the log file.
#define MAX_LOG_FILES 100 // Number of log files that can be made
#define LOG_FILE_SUFFIX "csv" // Suffix of the log file
char logFileName[13]; // Char string to store the log file name
// Data to be logged:
#define LOG_COLUMN_COUNT 8
char * log_col_names[LOG_COLUMN_COUNT] = {
  "longitude", "latitude", "altitude", "speed", "course", "date", "time", "satellites"
}; // log_col_names is printed at the top of the file.

//////////////////////
// Log Rate Control //
//////////////////////
#define LOG_RATE 5000 // Log every 5 seconds
unsigned long lastLog = 0; // Global var to keep of last time we logged

/////////////////////////
// TinyGPS Definitions //
/////////////////////////
TinyGPSPlus tinyGPS; // tinyGPSPlus object to be used throughout
#define GPS_BAUD 9600 // GPS module's default baud rate

////////////////////////////////////////////////
// Arduino GPS Shield Serial Port Definitions //
////////////////////////////////////////////////
// If you're using an Arduino Uno, Mega, RedBoard, or any board that uses the
// 0/1 UART for programming/Serial monitor-ing, use SoftwareSerial:
#include <SoftwareSerial.h>
#define ARDUINO_GPS_RX 3 // GPS TX, Arduino RX pin
#define ARDUINO_GPS_TX 2 // GPS RX, Arduino TX pin
SoftwareSerial ssGPS(ARDUINO_GPS_TX, ARDUINO_GPS_RX); // Create a SoftwareSerial

// Set gpsPort to either ssGPS if using SoftwareSerial or Serial1 if using an
// Arduino with a dedicated hardware serial port
#define gpsPort ssGPS  // Alternatively, use Serial1 on the Leonardo

// Define the serial monitor port. On the Uno, Mega, and Leonardo this is 'Serial'
//  on other boards this may be 'SerialUSB'
#define SerialMonitor Serial

void setup()
{
  SerialMonitor.begin(9600);
  gpsPort.begin(GPS_BAUD);

  SerialMonitor.println("Setting up SD card.");
  // see if the card is present and can be initialized:
  if (!SD.begin(ARDUINO_USD_CS))
  {
    SerialMonitor.println("Error initializing SD card.");
  }
  updateFileName(); // Each time we start, create a new file, increment the number
  printHeader(); // Print a header at the top of the new file
}

void loop()
{
  if ((lastLog + LOG_RATE) <= millis())
  { // If it's been LOG_RATE milliseconds since the last log:
    if (tinyGPS.location.isUpdated()) // If the GPS data is vaild
    {
      if (logGPSData()) // Log the GPS data
      {
        SerialMonitor.println("GPS logged."); // Print a debug message
        lastLog = millis(); // Update the lastLog variable
      }
      else // If we failed to log GPS
      { // Print an error, don't update lastLog
        SerialMonitor.println("Failed to log new GPS data.");
      }
    }
    else // If GPS data isn't valid
    {
      // Print a debug message. Maybe we don't have enough satellites yet.
      SerialMonitor.print("No GPS data. Sats: ");
      SerialMonitor.println(tinyGPS.satellites.value());
    }
  }

  // If we're not logging, continue to "feed" the tinyGPS object:
  while (gpsPort.available())
    tinyGPS.encode(gpsPort.read());
}

byte logGPSData()
{
  File logFile = SD.open(logFileName, FILE_WRITE); // Open the log file

  if (logFile)
  { // Print longitude, latitude, altitude (in feet), speed (in mph), course
    // in (degrees), date, time, and number of satellites.
    logFile.print(tinyGPS.location.lng(), 6);
    logFile.print(',');
    logFile.print(tinyGPS.location.lat(), 6);
    logFile.print(',');
    logFile.print(tinyGPS.altitude.feet(), 1);
    logFile.print(',');
    logFile.print(tinyGPS.speed.mph(), 1);
    logFile.print(',');
    logFile.print(tinyGPS.course.deg(), 1);
    logFile.print(',');
    logFile.print(tinyGPS.date.value());
    logFile.print(',');
    logFile.print(tinyGPS.time.value());
    logFile.print(',');
    logFile.print(tinyGPS.satellites.value());
    logFile.println();
    logFile.close();

    return 1; // Return success
  }

  return 0; // If we failed to open the file, return fail
}

// printHeader() - prints our eight column names to the top of our log file
void printHeader()
{
  File logFile = SD.open(logFileName, FILE_WRITE); // Open the log file

  if (logFile) // If the log file opened, print our column names to the file
  {
    int i = 0;
    for (; i < LOG_COLUMN_COUNT; i++)
    {
      logFile.print(log_col_names[i]);
      if (i < LOG_COLUMN_COUNT - 1) // If it's anything but the last column
        logFile.print(','); // print a comma
      else // If it's the last column
        logFile.println(); // print a new line
    }
    logFile.close(); // close the file
  }
}

// updateFileName() - Looks through the log files already present on a card,
// and creates a new file with an incremented file index.
void updateFileName()
{
  int i = 0;
  for (; i < MAX_LOG_FILES; i++)
  {
    memset(logFileName, 0, strlen(logFileName)); // Clear logFileName string
    // Set logFileName to "gpslogXX.csv":
    sprintf(logFileName, "%s%d.%s", LOG_FILE_PREFIX, i, LOG_FILE_SUFFIX);
    if (!SD.exists(logFileName)) // If a file doesn't exist
    {
      break; // Break out of this loop. We found our index
    }
    else // Otherwise:
    {
      SerialMonitor.print(logFileName);
      SerialMonitor.println(" exists"); // Print a debug statement
    }
  }
  SerialMonitor.print("File name: ");
  SerialMonitor.println(logFileName); // Debug print the file name
}
Ao ligar o Arduino, dê uma caminhada na rua e logo você deverá ver o LED GPS fix piscar. Continue caminhando, ou ande de preferência de carro, para coletar uma boa quantidade de coordenadas.
Desligue o Arduino, retire o cartão e insira em algum computador. Você deverá ver o arquivo gerado. Abra o arquivo no excel e o arquivo deverá conter mais ou menos o seguinte conteúdo:

Visualizando as coordenadas no Google My Maps
Para melhor visualizar os dados coletados no arduino GPS Shield, você poderá carregá-los no Google My Maps.
Acesse o My Maps e clique em “Create a New Map”.

Para carregar o arquivo .CSV clique em “Import”.

Então busque e abra o arquivo .CSV gravado no cartão SD.

É possível fazer várias customizações no mapa, por exemplo, criar um traçado entre os pontos.

Veja neste link como criar e customizar mapas no My Maps.
Veja a seguir um mapa interativo com as coordenadas de GPS:
Gostou do Arduino GPS Shield Duinopeak? Ajude-nos a melhorar o blog atribuindo uma nota a este tutorial (estrelas no final do artigo), comente e visite nossa loja FILIPEFLOP!
Site: Blog FILIPEFLOP